How to format an M.2 SSD enclosure for first use
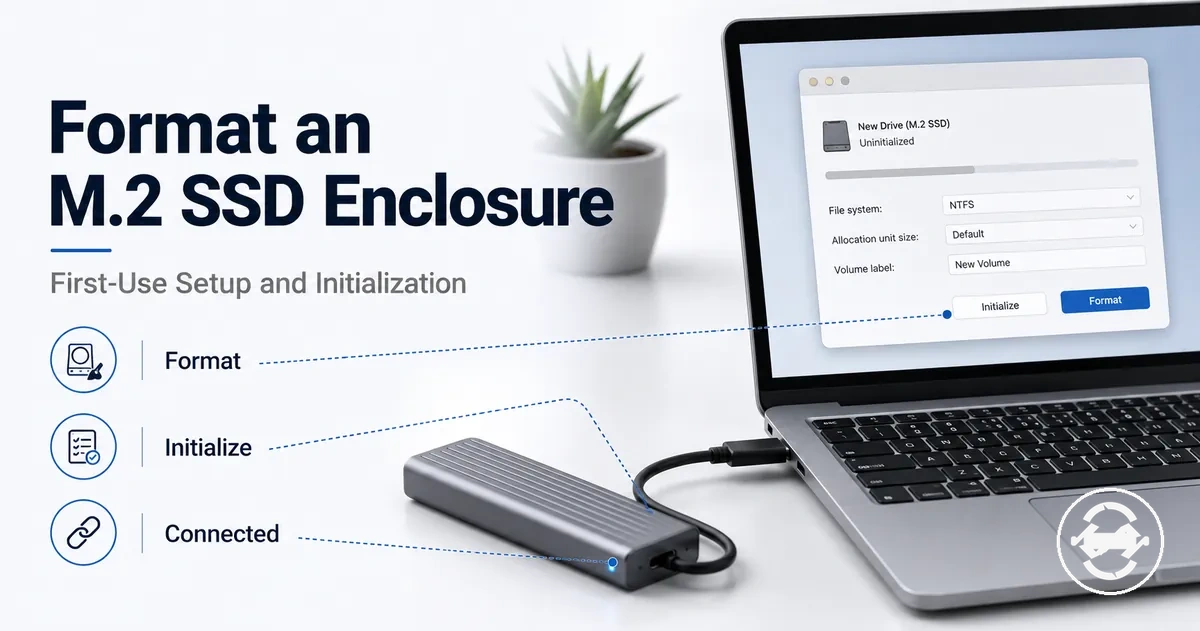
Formatting an M.2 SSD enclosure for first use starts with confirming the SSD is detected, initializing the disk when needed, choosing a file system, and creating a usable volume. The SSD should already be installed in the enclosure before software preparation begins. The goal is to prepare the SSD as a usable external drive. The main sequence is detection, initialization, file system selection, and usable volume creation.
A new SSD may need formatting because the operating system can detect the disk but it is not yet ready to store files. A reused SSD may need formatting if previous files, partitions, or an older setup are no longer required. Windows and Mac may present different disk utilities and formatting options, but the same safety principle applies: verify the correct disk and back up important data before choosing to erase or format because these actions can result in data loss. For broader enclosure context before this software preparation step, visit the M.2 SSD enclosure hub.
Formatting is a software preparation task and is not a substitute for installing the SSD correctly or resolving a drive that is not detected. If the operating system cannot detect the M.2 SSD enclosure, the cause may relate to the SSD installation, cable, enclosure chipset, connection, or drive condition rather than the formatting process. Once the SSD is detected, the next section explains the preparation steps in more detail.
Windows may use NTFS or exFAT, while Mac may use APFS or exFAT, depending on how the external drive will be used. The appropriate partition scheme and file system can vary with the operating system and intended use of the SSD.
What formatting prepares on a new M.2 SSD enclosure
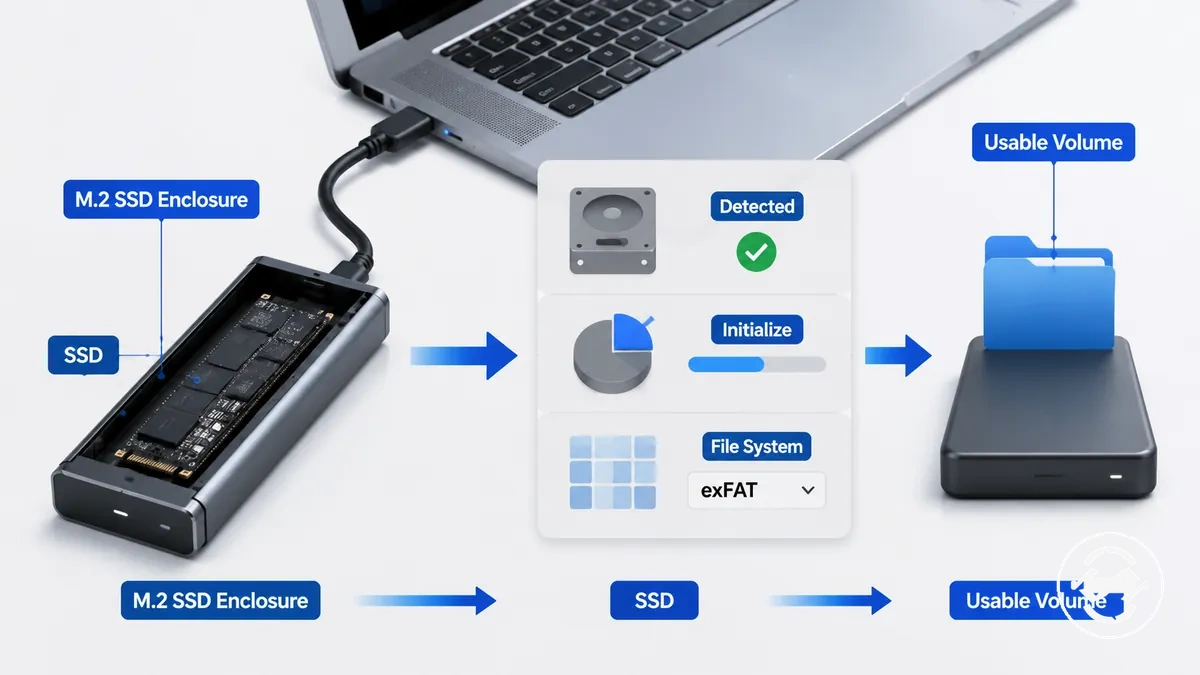
Formatting prepares the SSD inside an M.2 SSD enclosure so the operating system can store files on it. The enclosure provides the external interface, while the SSD provides the storage. Formatting creates a file system that the operating system can read and use. The result is a usable volume that can appear as an external drive.
The image below shows how formatting prepares the SSD after the physical enclosure setup is already complete. It separates the hardware connection from the software changes that prepare a usable storage volume.
Terms such as formatting, initialization, and partitioning are often used together, but they describe different stages of preparing a drive.
- Detected: The operating system can see the SSD connected through the M.2 SSD enclosure.
- Initialized: The disk receives a partition scheme so it can be prepared for storage.
- Partitioned: One or more partitions organize the available disk space.
- Formatted: A file system is written so the operating system can store and retrieve files.
- Mounted: The formatted volume becomes available in the file browser as an external drive.
Formatting does not usually resolve detection problems or change hardware compatibility. It is a software preparation step that comes after the SSD is installed correctly and detected by the operating system. For example, a new blank SSD may appear in disk tools as detected but uninitialized or unallocated, so it may not appear in the file browser until the preparation process is complete.
Before formatting the SSD inside the enclosure
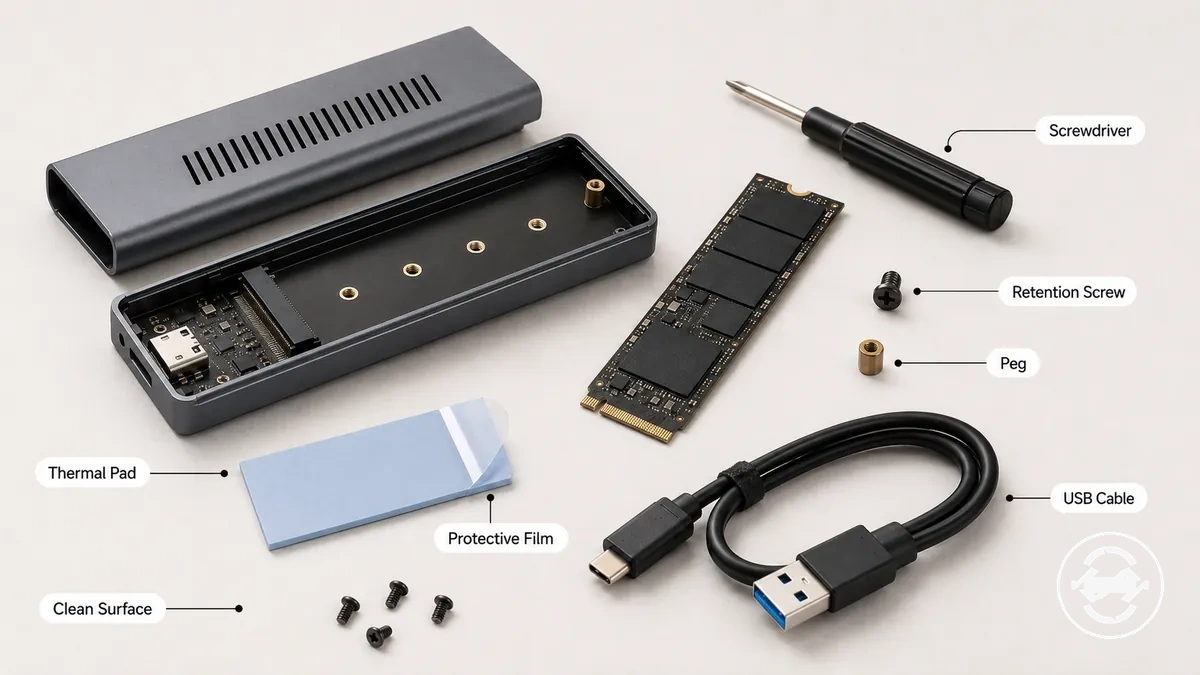
The SSD inside the enclosure should be installed, detected, and safe to erase before formatting begins. A stable USB connection, operating-system visibility, and awareness of existing data are all part of first-use preparation. Verify these conditions before making changes. Use the checklist below to confirm that formatting can safely begin.
- Installed SSD: The SSD inside the enclosure is installed correctly so the drive can be recognized.
- USB connection: The USB connection remains stable and the enclosure stays connected during preparation.
- Detected: The correct disk is visible in the operating system or disk utility before formatting.
- Disk state: The drive appears as unallocated, uninitialized, or already formatted, helping determine the appropriate next step.
- Data safety: If important files are present, create a backup before you erase the correct disk.
- Next action: If every condition is met, the drive is generally ready to format. Otherwise, correct the unmet condition before continuing.
Skipping these checks can lead to formatting the wrong disk or confusing a visibility issue with a formatting task. If the SSD is not visible in disk utility, formatting may not be the appropriate next step. If the SSD has not yet been installed correctly, install the SSD first before preparing it for use. A drive that satisfies the checklist is generally safe to format, while missing conditions should be corrected first.
Installation and USB connection checks
The enclosure must be physically assembled and connected before formatting can begin. The operating system should detect the attached storage in a disk tool before any formatting action is attempted. Use the checks below to verify the physical connection and software visibility.
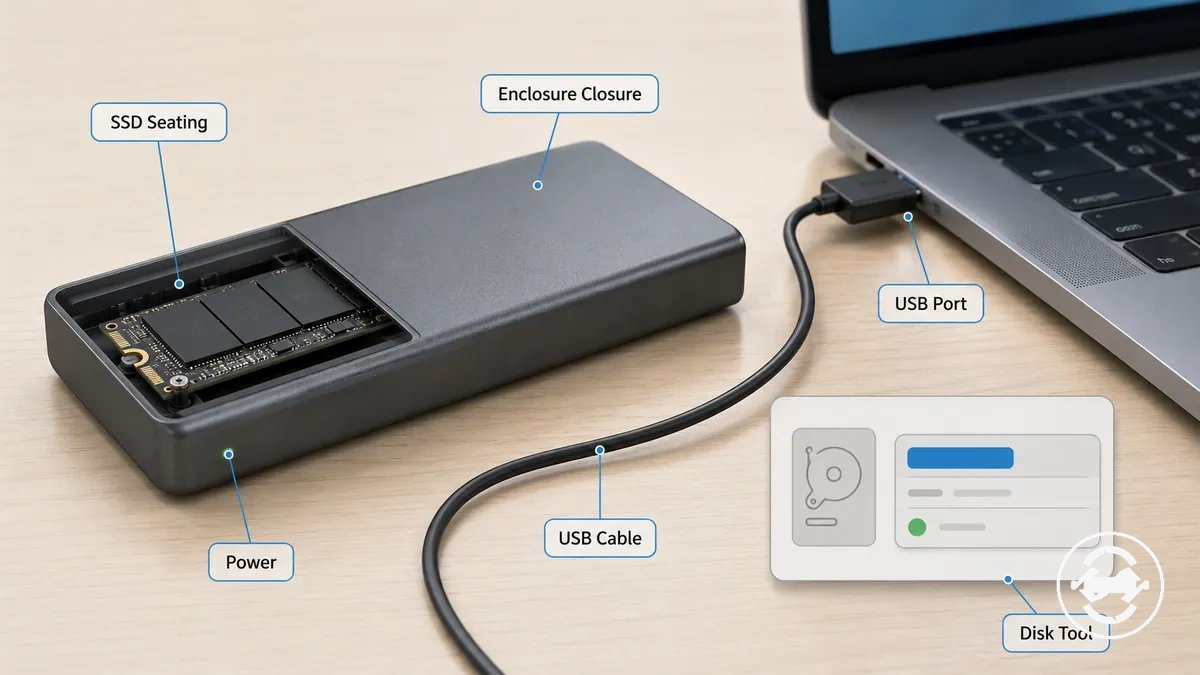
- Confirm SSD seating is secure and the connector is fully engaged.
- Check enclosure closure is complete so the SSD remains seated.
- Ensure the USB cable is firmly connected at both ends.
- Verify the USB port provides a stable connection and sufficient power when required.
- Confirm the disk tool shows detected storage before formatting can begin.
Data loss checks before erasing the drive
Caution: Erase, format, or initialize actions can remove access to existing files. Before making changes, confirm that you have selected the correct disk and identified whether it is a blank SSD or a reused SSD. Use the checklist below to reduce the risk of unintended data loss.
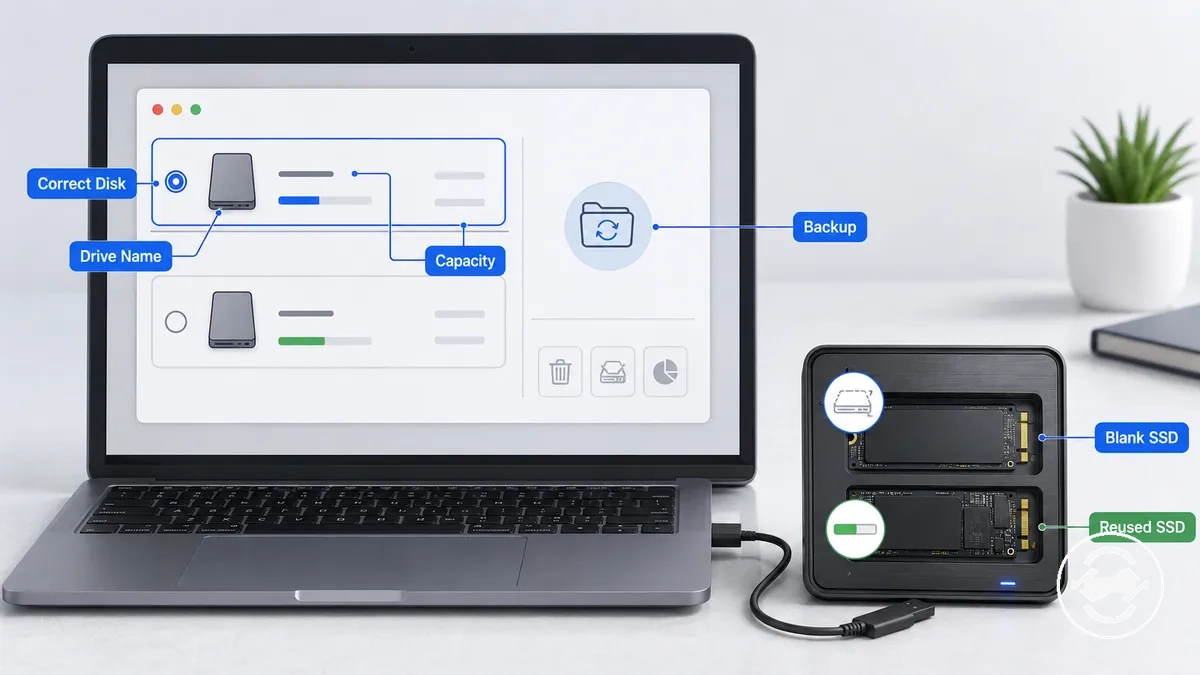
- Verify the correct disk by checking both the drive name and capacity.
- If the drive is a reused SSD, create a backup before you erase or format it.
- If the drive is a blank SSD, confirm it is the intended storage device before you initialize or format it.
- Check whether the selected drive contains existing files before choosing an erase or format action.
- Remember that data loss can occur after erase, format, or initialize operations, while recoverability may depend on the drive's previous state and the action performed.
Initialize the SSD before creating a usable volume
Initialization may be required when an external SSD is blank or appears as an uninitialized disk. Initializing prepares the disk with a partition scheme so a partition and formatted volume can be created. Not every SSD requires this step because the initial disk state can vary. When initialization is needed, it comes before volume creation.
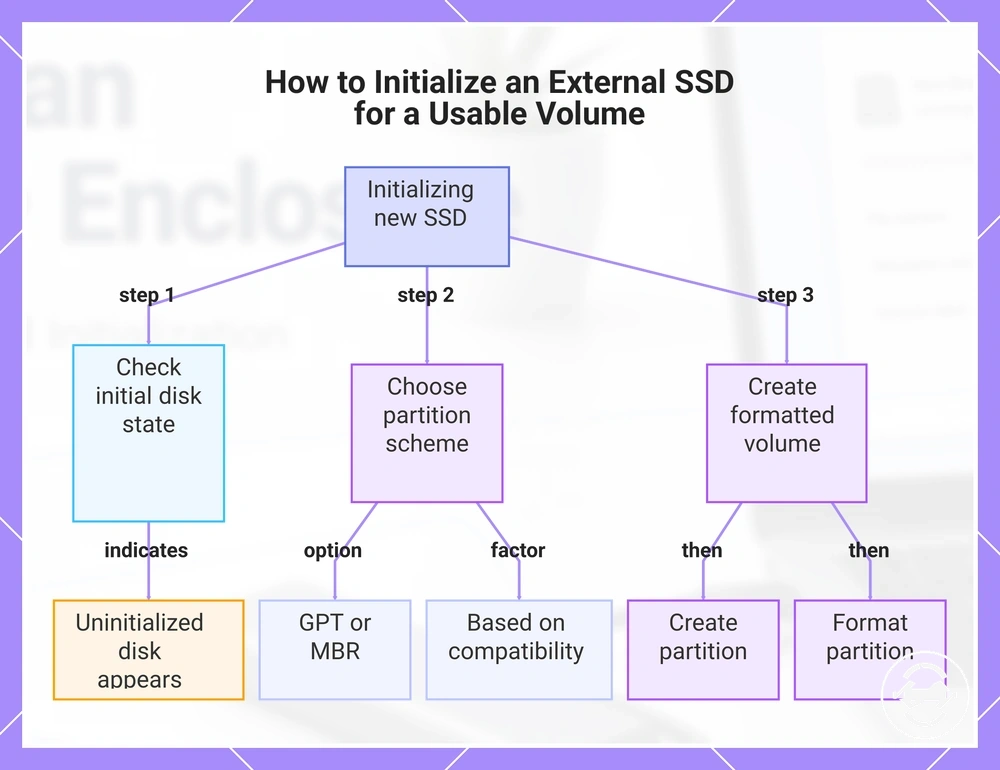
An uninitialized disk usually appears in a disk utility before it has a usable storage structure. The disk utility may prompt you to initialize the drive before creating a partition. The main partition-scheme choice is typically GPT or MBR, and the appropriate option can depend on operating system compatibility and intended use. Use the steps below to move from disk status to usable volume.
- Open a disk utility and check whether the external SSD appears as an uninitialized disk.
- If the disk utility prompts you, initialize the disk before creating a volume.
- Choose GPT or MBR as the partition scheme based on compatibility needs.
- Create a partition after the disk has been initialized.
- Format the partition to create a usable volume for the external SSD.
This chart shows the process to initialize an uninitialized external SSD, choose the partition scheme, and create a formatted volume.
Partition scheme choices for external enclosure use
The partition scheme choice usually comes down to GPT for a modern system or MBR for legacy compatibility. A partition scheme organizes how a disk can hold a volume before the file system is applied. The choice affects operating system support and compatibility, not raw enclosure speed. Use the comparison below inside the initialization decision.
| Partition scheme | When it may fit |
|---|---|
| GPT | Usually fits a modern system when the external drive will be used with current operating system support. |
| MBR | May fit legacy devices or older system requirements where GPT support is limited. |
Choose a file system for Windows, Mac, or shared use
The right file system depends on whether the M.2 SSD enclosure will be used with Windows, Mac, or shared use across both. File-system choice affects read-write support, large files, and how easily the external SSD works across operating systems. Use the table below to match the use case with the practical outcome.
Shared-use setups often need a format type that both Windows and Mac can read and write without extra setup. Backup or media storage may need a different choice depending on the operating system and backup software. No file system is universally best, so choose based on the device mix and how the drive will be used after formatting.
| Use case | File-system choice | Compatibility condition | Practical outcome |
|---|---|---|---|
| Windows-only external SSD use | NTFS | May fit when the drive will mainly be used with Windows. | Supports Windows-centered read-write use and regular storage tasks. |
| Mac-only SSD use | APFS | May fit when the drive will mainly stay in a Mac environment. | Supports Mac-centered storage, backup, or media workflows. |
| Shared Windows and Mac use | exFAT | Often used when both Windows and Mac need read-write support. | Helps the external SSD remain practical for cross-platform file transfer. |
| Large files and portable media | exFAT | May fit when large files need to move between Windows and Mac devices. | Supports a portable drive workflow without locking the drive to one system. |
| Backup-focused use | NTFS or APFS | The choice should match the operating system used for backup. | Keeps the external SSD aligned with the backup environment. |
NTFS, exFAT, and APFS for an external M.2 SSD
NTFS, exFAT, and APFS mainly differ by platform fit and intended use. NTFS is usually Windows-centered, exFAT is often used for shared use between Windows and Mac, and APFS is usually Mac-centered. The right file system for an external M.2 SSD depends on read-write needs, operating system behavior, and whether the drive will move between devices. Use the comparison below for the local file-system decision.
| File system | When it may fit |
|---|---|
| NTFS | May fit Windows-centered read-write use when the external drive will mainly stay with Windows. |
| exFAT | May fit shared use when Windows and Mac both need practical access to the same drive. |
| APFS | May fit Mac-centered SSD use, backup, or storage workflows when the drive will mainly stay with Mac. |
Format an M.2 SSD enclosure on Windows
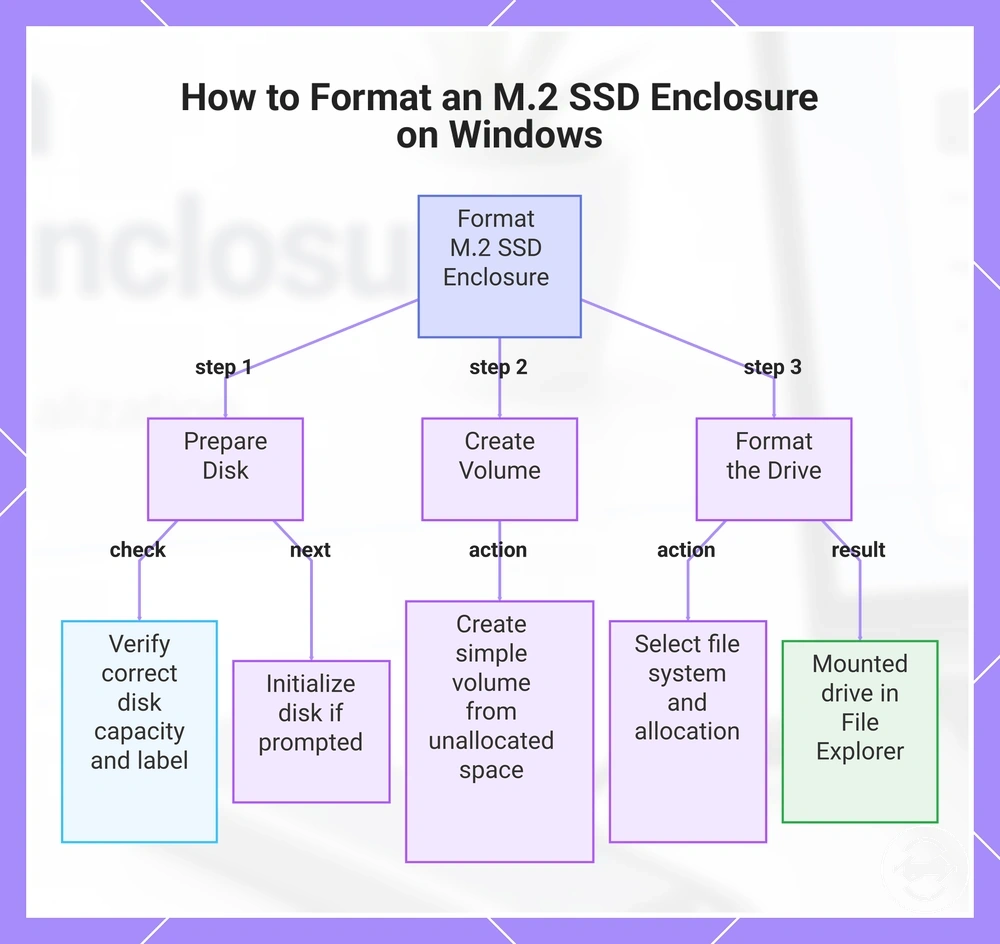
Windows formatting usually starts in Disk Management after the M.2 SSD enclosure appears as a detected disk. From there, you can initialize the disk if prompted, create a simple volume, choose a file system, and format the drive for use. Before applying any changes, verify the correct disk by checking its capacity and label to reduce the risk of data loss.
- Open Disk Management and locate the detected disk that matches the SSD inside the enclosure.
- Verify the correct disk by confirming its capacity and label before continuing.
- If Windows prompts you to initialize the disk, complete that step before creating a volume.
- Create a simple volume using the available unallocated space, if required.
- Select the preferred file system. Keep the default allocation unit if it matches your intended use.
- Enter a volume label and continue with the format process. A drive letter may be assigned during this step, depending on the Windows version and current configuration.
- Finish the wizard and confirm the formatted volume appears as a mounted drive in File Explorer.
When the new volume appears in File Explorer, the external drive is generally ready for file storage. If Windows uses different menu names or prompts, follow the equivalent options while continuing to verify that the selected disk is the intended SSD.
This chart shows the process to format an M.2 SSD enclosure on Windows using Disk Management, including verifying the disk, creating a volume, and formatting with a file system.
Format an M.2 SSD enclosure on Mac
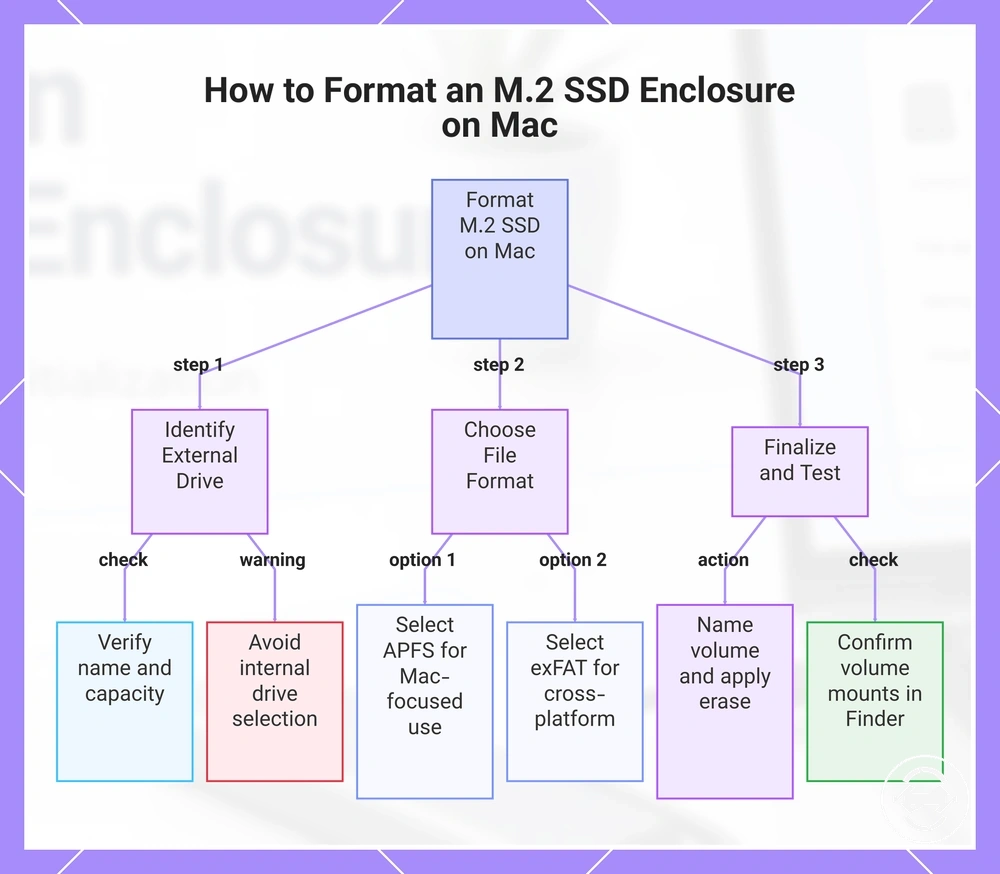
Formatting an M.2 SSD enclosure on macOS usually starts in Disk Utility by selecting the correct external disk and using the erase function. The process includes choosing a suitable scheme, selecting a format, naming the drive, and confirming that the volume mounts successfully. Before erasing any disk, distinguish the external enclosure from the internal Mac drive by checking the disk name and capacity.
- Open Disk Utility and locate the connected external disk that matches the SSD inside the enclosure.
- Verify the correct disk by confirming its name and capacity so the internal Mac drive is not selected.
- Select Erase, then choose an appropriate scheme if Disk Utility displays that option.
- Select a format. APFS may suit Mac-focused use, while exFAT may be appropriate when the drive will also be used with other operating systems.
- Enter a name for the external volume and apply the erase action to create the new file system.
- After the process finishes, confirm the volume mounts and appears in Finder as a usable external drive.
When the mounted volume appears in Finder, the external SSD is generally ready for file storage. The most suitable format depends on how the drive will be used after preparation.
This chart shows the main steps to format an M.2 SSD enclosure in macOS Disk Utility, including drive identification, file system selection, and verification.
When the enclosure does not initialize or format
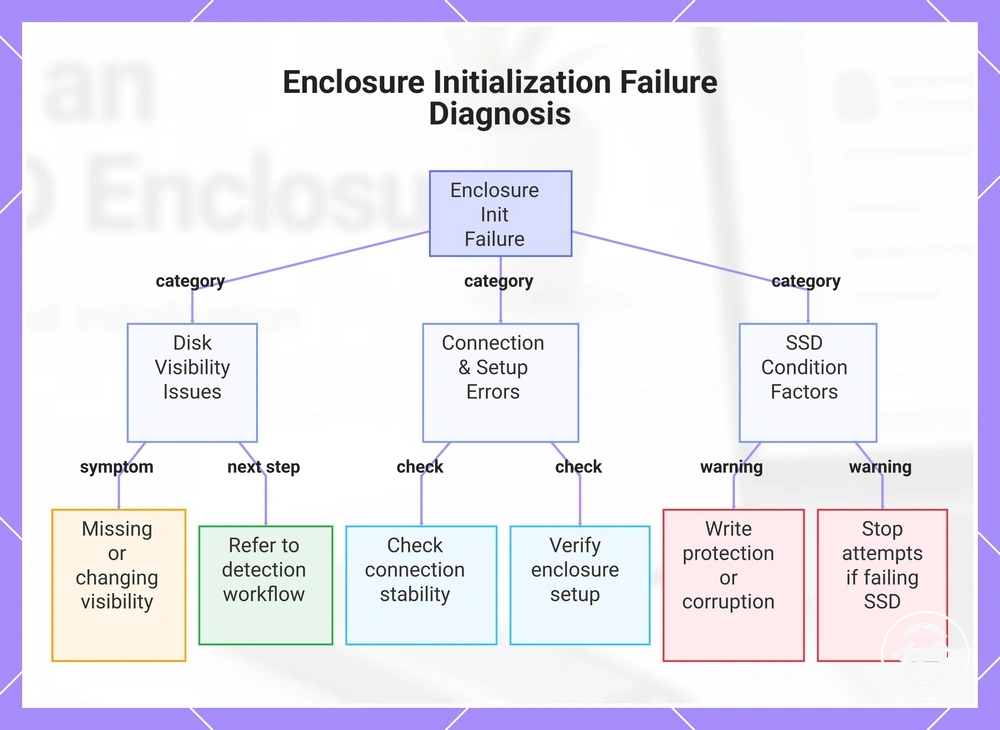
When initialization or formatting fails, identify the cause before repeating the same action. A failed initialization, missing disk, or format error can have different causes even though they occur during the same setup process. Separating these conditions helps you choose the safest next step and avoid unnecessary changes. The main diagnostic categories are disk visibility, connection stability, permission or utility errors, and SSD condition.
If the disk is visible, retry only after confirming the correct disk and reviewing the reported error. If the enclosure setup or connection appears unstable, check those items before attempting another format. Stop repeated formatting attempts if the SSD reports write protection, shows a corrupted partition, or may be a failing SSD, especially when data safety is a concern. If the drive is missing rather than producing a format error, see drive not showing up for a dedicated detection workflow.
- Detected disk but failed initialization: Retry safely after confirming the correct disk and reviewing the initialization message.
- Format error with a visible disk: Check for a permission error, write protection, or a disk utility error before trying again.
- Missing disk or changing disk visibility: Verify connection stability and the enclosure setup before attempting another initialization.
- Visible disk with a corrupted partition: Recreate the partition only after confirming the correct drive and understanding that existing data may be affected.
- Repeated write protection or failed erase messages: Stop repeated attempts and check whether the SSD or enclosure has another underlying limitation.
- Possible failing SSD: Avoid repeated initialization or formatting attempts until the SSD condition has been assessed.
This chart shows the main diagnostic categories for a failed enclosure initialization or format, helping to identify the cause and choose the safest next step.
Drive not detected before formatting
Formatting cannot start while the SSD or enclosure is not detected in an operating-system disk tool. The disk must appear as a visible device before normal formatting is possible. Use the checks below to verify the local detection prerequisites.
- USB cable: Check that the USB cable is securely connected and the external drive maintains a stable connection.
- Port: Try another port if the enclosure does not appear as a visible device in the disk tool.
- Enclosure assembly: Confirm the enclosure assembly is complete and properly connected before checking again.
- SSD seating: Verify the SSD seating if the enclosure is connected but no detected storage appears.
- Incompatible drive type: Confirm that the SSD matches the enclosure's supported drive type if the disk remains missing.
- Disk tool: Check whether any visible device appears in the operating-system disk tool before continuing with formatting.
Formatting errors after the drive appears
When a visible disk shows a formatting error, diagnose the error message and the current disk state before repeating the same action. Errors that occur after the drive appears in the operating-system disk utility usually require a different response than no-detection cases. Match the message type to the next action, and stop if the drive was not actually blank to help preserve data safety.
- Failed erase: Review the error message and confirm the selected disk before attempting another erase.
- Format option unavailable: Check whether the current disk state allows the selected format option before trying again.
- Partition creation failure: Verify the disk state before repeating the partition creation process.
- Read-only or permission message: Treat the message as a separate condition and retry only after identifying the underlying cause.
- Repeated failure: Repeated failures may indicate SSD instability or an enclosure issue. Stop repeated attempts until the condition has been assessed.
- Non-blank drive: If the visible disk may contain existing files, stop before reformatting until data safety has been considered.
After formatting the enclosure for regular use
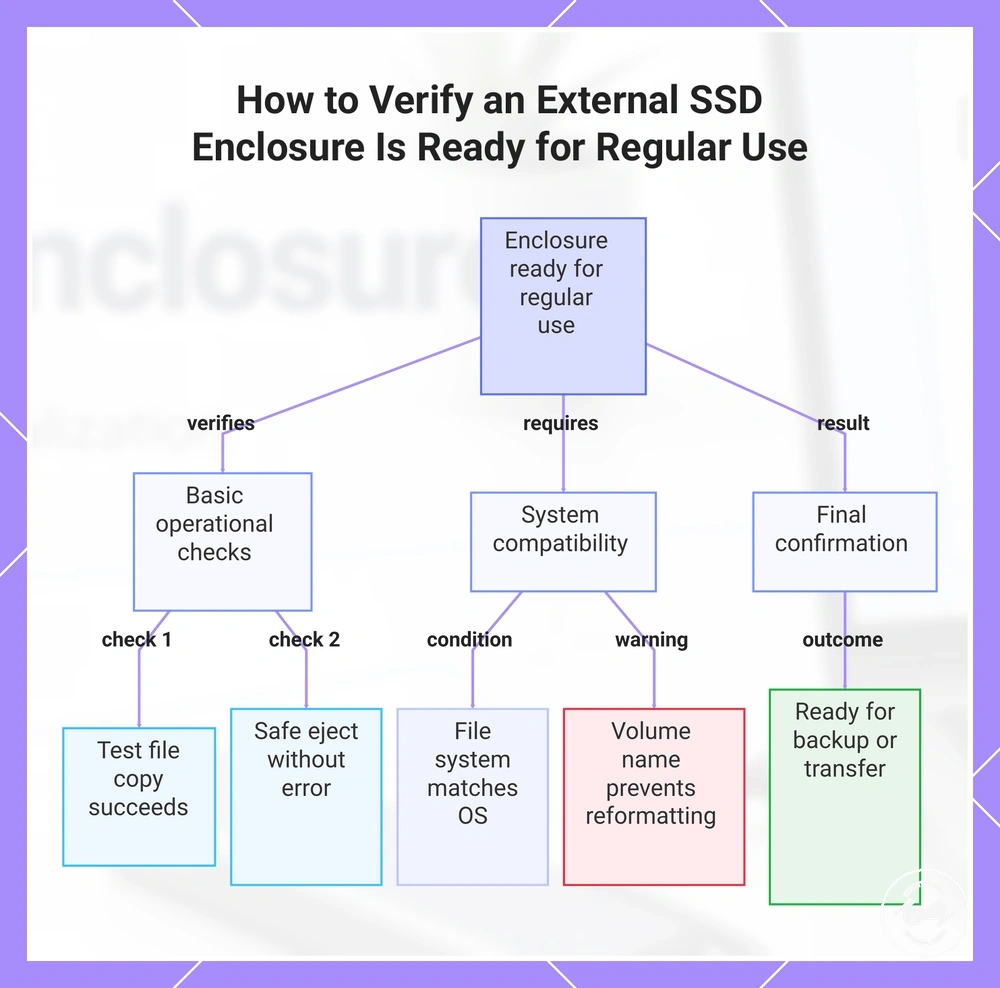
The enclosure is ready for regular use when it appears as a mounted external drive, completes a test file copy, and supports safe eject without reporting an error. These checks confirm that the formatted volume is ready for everyday storage tasks. Use the checklist below before relying on the drive for ongoing use.
If the external SSD will be used for backup or file transfer, confirm that the selected file system matches your Windows, Mac, or shared-use requirements. Keep the volume name recognizable to reduce the chance of accidental reformatting later. After these checks, continue with backup and file transfer setup.
- Confirm the mounted external drive appears normally in the operating system.
- Perform a test file copy to verify that files can be written to and read from the drive.
- Use safe eject before disconnecting the enclosure after file activity.
- Verify that the chosen file system matches your intended Windows, Mac, or shared-use environment.
- Confirm the drive is ready for backup or file transfer without changing the existing format.
- Avoid accidental reformatting by confirming the correct volume before using disk-management tools.
This chart shows the essential checks to confirm that a formatted external SSD enclosure is ready for daily use, including operational tests and compatibility verification.