
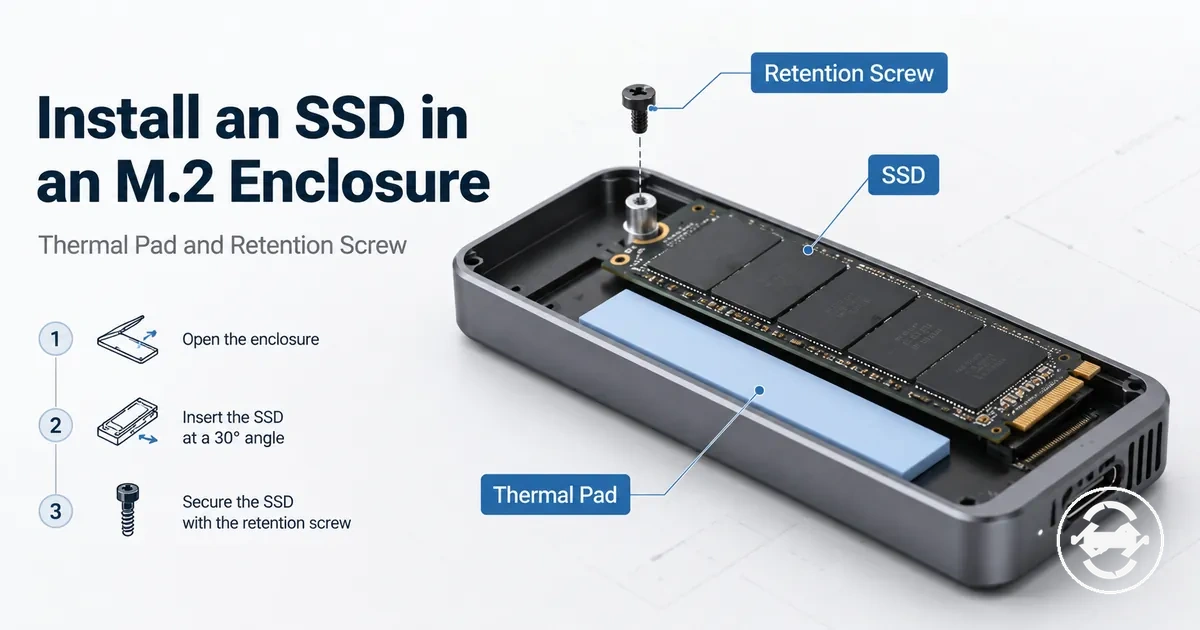
Installing an SSD in an M.2 SSD Enclosure
Installing an SSD in an M.2 SSD enclosure starts with confirming compatibility, then seating the M.2 SSD into the connector, securing it with the correct retention method, setting any thermal pad for contact, and checking the enclosure on first use. The installation is a physical assembly task, not a full formatting or troubleshooting process. Enclosure designs vary, so screws, latches, trays, and thermal layouts may not follow the same handling pattern.
If you are turning an internal M.2 SSD into an external drive, check the SSD key notch, drive size, enclosure slot, connector direction, retention method, thermal pad position, and USB cable before applying pressure. The outer case should close without shifting the drive, and the first use check should confirm whether the computer recognizes the enclosure. For broader context before the physical steps, use the M.2 SSD enclosure guide, then continue with the compatibility checks before handling the drive.
A drive that does not fit cleanly or is not detected after assembly may point to compatibility, seating, retention, cable, or first-use setup conditions. Keep those issues as boundary checks at this stage rather than assuming the SSD or enclosure is faulty. Verify the drive and enclosure requirements before inserting the SSD into the connector.
Compatibility checks before installing the SSD
Compatibility must be checked before inserting the SSD into the enclosure. Confirming both the physical fit and electronic support before installation can help prevent poor fit or detection problems after assembly.
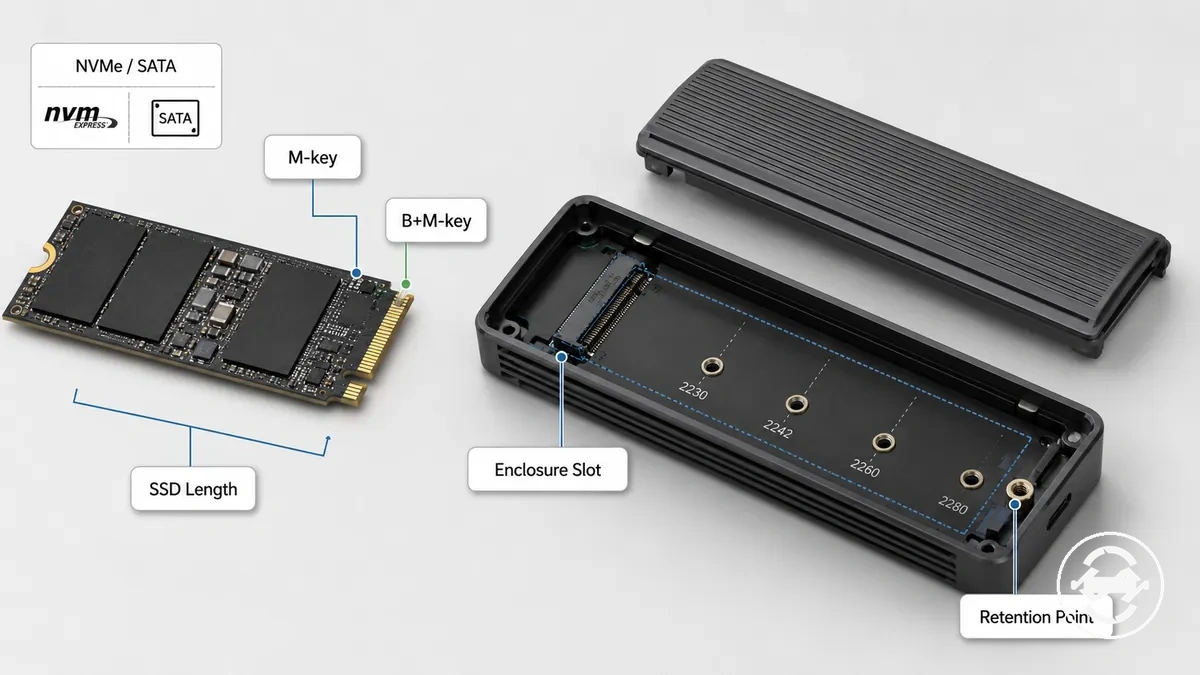
Check the SSD protocol, key notch, SSD length, enclosure slot, and retention position before handling the drive. Physical compatibility depends on the connector, key notch, mounting point, and retention position, while electronic compatibility depends on protocol support between the SSD and enclosure. Before continuing, check compatibility first so the enclosure and drive meet the required installation criteria.
If the enclosure supports only NVMe or only SATA, the SSD should use the same protocol. A dual-protocol enclosure may support both drive types, but compatibility still depends on the enclosure design.
Verify the following before inserting the SSD:
- Confirm the SSD protocol matches the enclosure support. A protocol mismatch may prevent detection.
- Check the key notch. An M-key or B+M-key SSD should align with the enclosure connector.
- Verify the SSD length, such as 2280 when supported by the enclosure, so the drive reaches the correct retention position.
- Inspect the enclosure slot to ensure it supports the intended drive type and connector layout.
- Confirm the retention position, including the standoff or latch position, matches the SSD length so the drive can be secured correctly.
Drive type, key, and size fit inside the enclosure
Drive type, key, and size must match the enclosure before the SSD is installed. Proper seating depends on protocol support, the correct key notch, and the SSD length matching the mounting position. Check these three fit factors before inserting the drive.
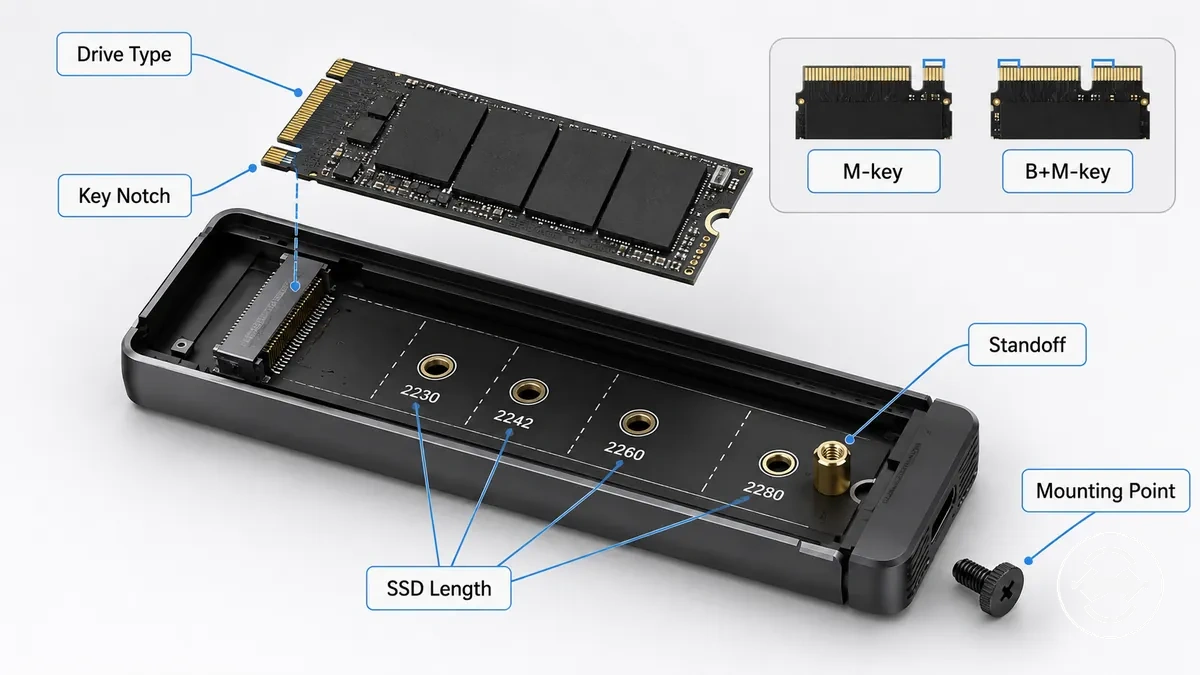
If the connector appears to match but the drive still cannot be installed correctly, the issue may be the protocol, the SSD length, or the retention point rather than the connector itself. For additional guidance on matching the drive length with the enclosure, review SSD size support before securing the drive.
- Confirm the drive type matches the enclosure. NVMe and SATA support depends on the enclosure design, and a protocol mismatch may prevent detection.
- Check the key notch. An M-key or B+M-key SSD should align with the enclosure connector before insertion.
- Verify the SSD length matches the enclosure's standoff or mounting position so the drive can be retained securely.
- Inspect the mounting position and retention point to ensure the SSD seats flat inside the enclosure without unnecessary force.
Enclosure opening style and retention method
The enclosure opening style changes how the SSD is accessed and secured, but the installation goal remains the same. Before inserting the SSD, identify how the cover opens and how the retention method holds the drive in place. Common designs use either a tool-free enclosure or a screw-based enclosure.
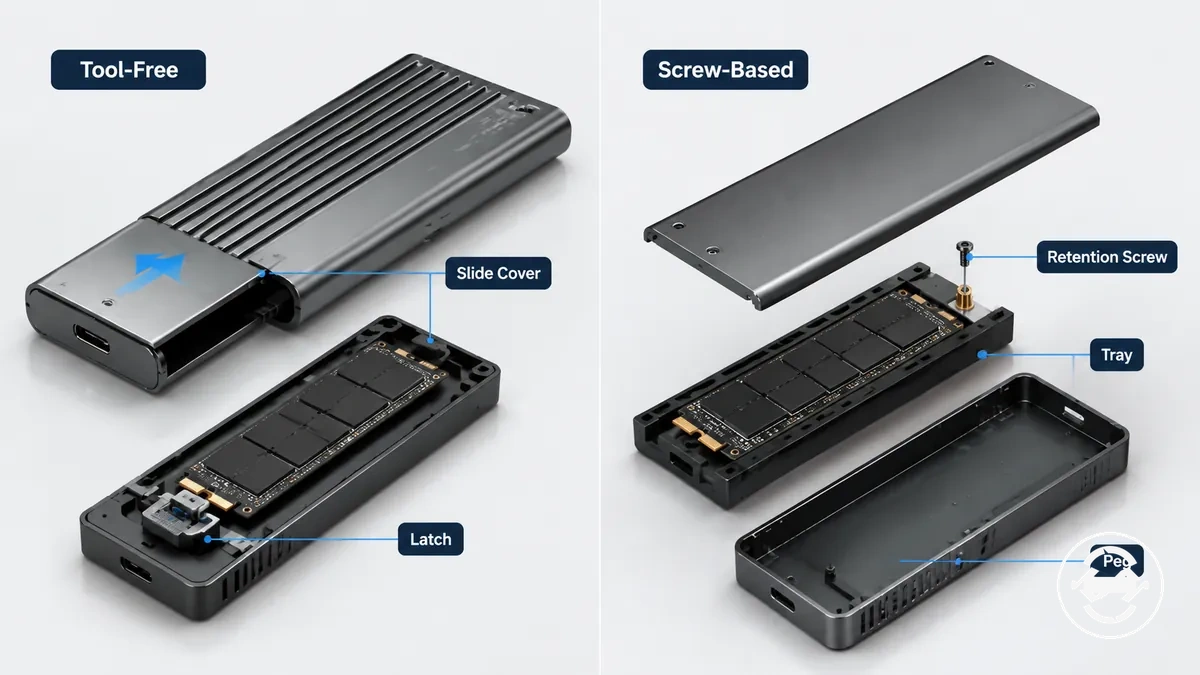
If the enclosure does not open as expected, inspect the cover, tray, latch, or retention point before applying pressure. Depending on the enclosure, a slide cover, hinged cover, retention screw, or peg may be used. Reviewing tool-free and screw-based designs can help you identify the correct opening and securing method.
| Opening or retention type | Installation handling note |
|---|---|
| Tool-free slide cover or latch | Open the cover or release the latch to access the tray, then close it after the SSD is seated. |
| Screw cover | Remove the cover screws to access the tray and reinstall them after assembly. |
| Retention screw | Secure the SSD through its end notch after aligning it with the connector and mounting position. |
| Rubber peg or plastic latch | Hold the SSD at the retention point without a metal retention screw, depending on the enclosure design. |
Tools and parts needed for the installation
The tools and parts needed for installation depend on the enclosure design. A screw-based enclosure may require different hardware from a tool-free enclosure, while items such as a thermal pad or USB cable also vary by model. Gather the required parts before opening the enclosure and starting the installation.
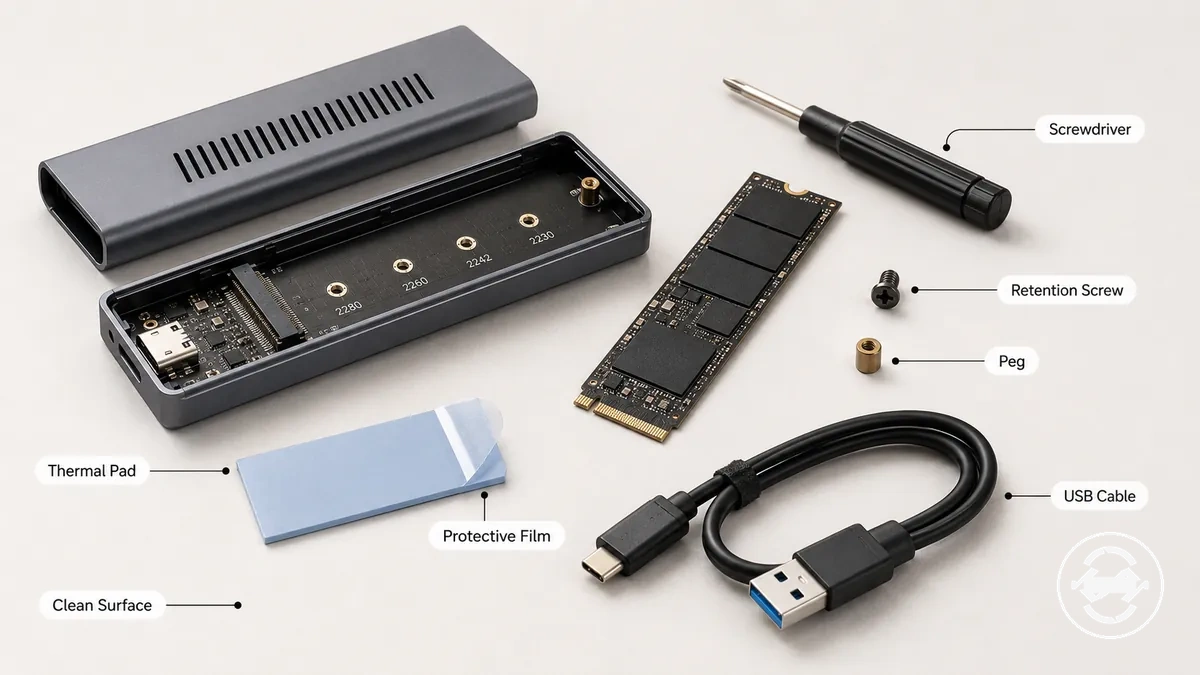
If you are using a tool-free enclosure, you may still need a thermal pad, a retention peg, or to remove a protective film before closing the cover. Preparing these items in advance can help keep the installation organized and reduce unnecessary handling of the SSD.
- Screwdriver: Use the type required for the enclosure cover or retention screw. It may not be needed for enclosures with a latch instead of screws.
- Enclosure screws: Keep the cover screws together if the enclosure uses removable fasteners. Tool-free designs may not include them.
- Retention screw or peg: Secure the SSD at the end notch with the supplied retention hardware when the enclosure design requires it.
- Thermal pad and protective film: Remove the protective film before positioning the thermal pad if one is included. Some enclosures may not use thermal material.
- USB cable: Connect the assembled enclosure to a computer for first-use recognition. The required cable depends on the enclosure.
- Clean work surface: Use a stable, uncluttered area to reduce the chance of losing screws, clips, or other small enclosure hardware during installation.
Screwdriver, screws, pegs, and latches
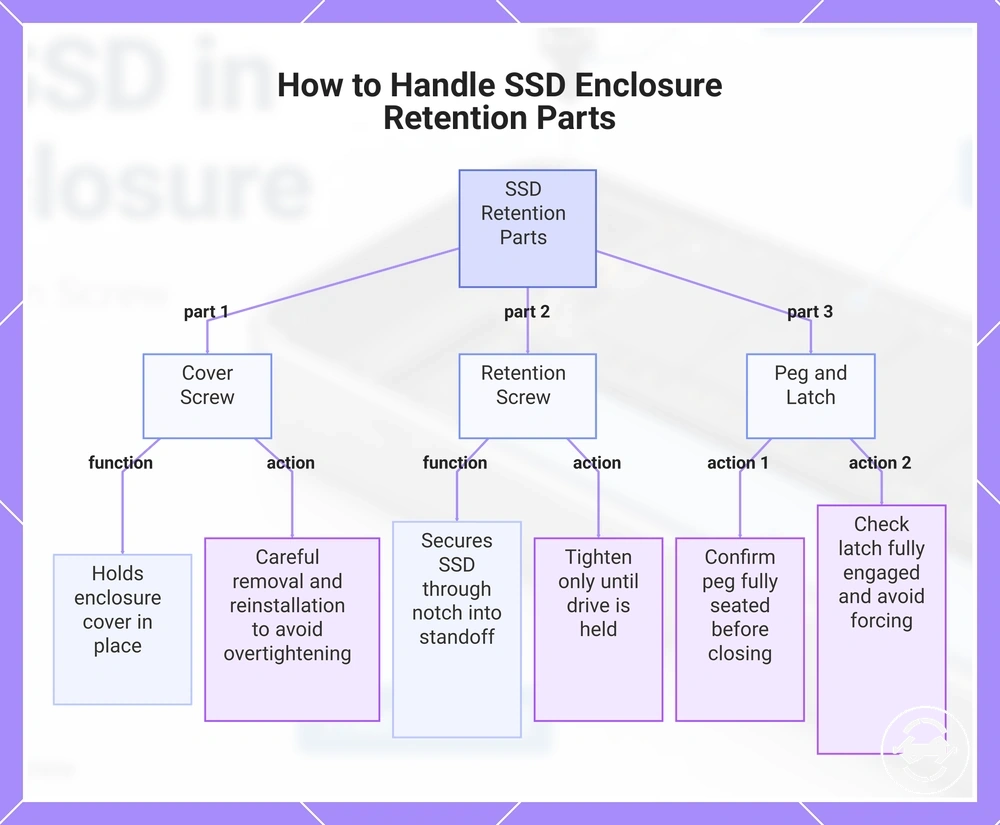
Before inserting the SSD, identify each retention part used by the enclosure and the screwdriver needed to handle it. Small components such as a cover screw, retention screw, peg, latch, or clip vary by enclosure, and using the wrong handling method may increase the risk of losing parts, thread damage, or overtightening during installation.
- Cover screw: Holds the enclosure cover in place during assembly. Remove and reinstall it with the appropriate screwdriver, taking care not to overtighten the screw point.
- Retention screw: Secures the SSD through the end notch into the standoff. Tighten only until the drive is held in place to reduce the chance of board flex or thread damage.
- Peg: A rubber mount or similar retainer may hold the SSD instead of a retention screw. Confirm that the peg is fully seated before closing the enclosure.
- Latch or clip: A plastic lock may secure the SSD or enclosure cover without screws. Check that the latch is fully engaged and avoid forcing it if resistance depends on the enclosure design.
This chart shows the main retention parts in an SSD enclosure and the correct handling action for each.
Thermal pad and protective film
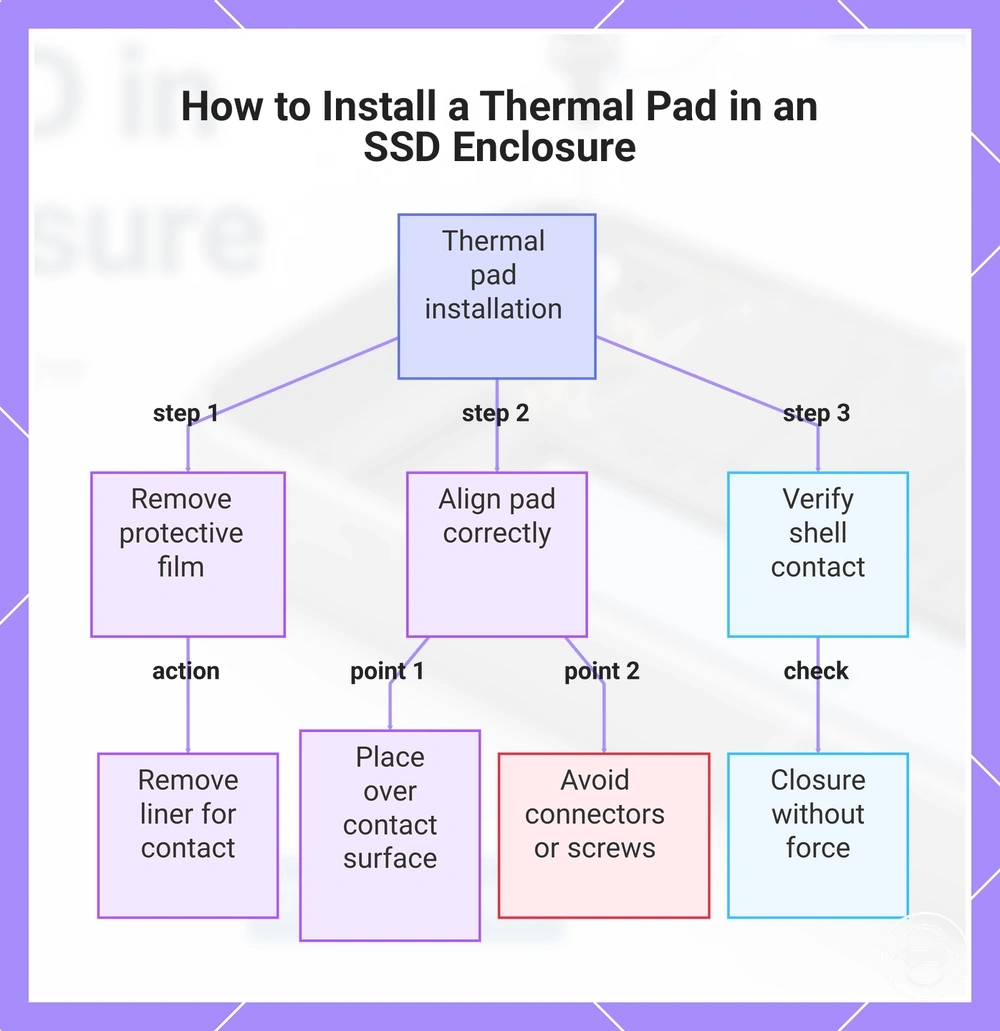
The thermal pad helps create contact between the SSD surface and the enclosure body when the enclosure design supports that contact path. Pad thickness, contact surface, and shell contact can affect whether heat transfer is helped by the thermal interface. If a protective film is present on the thermal pad, remove it before closing the enclosure.
Poor pad placement may leave a gap between the SSD and the enclosure shell, which can reduce contact instead of improving it. Align the thermal pad with the intended contact surface and check that enclosure closure can press the pad lightly against the SSD without shifting the drive.
- Protective film: Remove the liner when present so the thermal pad can contact the SSD surface or enclosure body.
- Pad alignment: Place the thermal pad over the intended contact surface, not over connectors, screws, or areas that prevent closure.
- Shell contact: Confirm the enclosure body or heatsink surface can close against the pad without forcing the outer shell.
This chart shows the three main steps for correctly installing a thermal pad in an SSD enclosure: removing the protective film, aligning the pad, and verifying shell contact.
Installing the SSD inside the enclosure
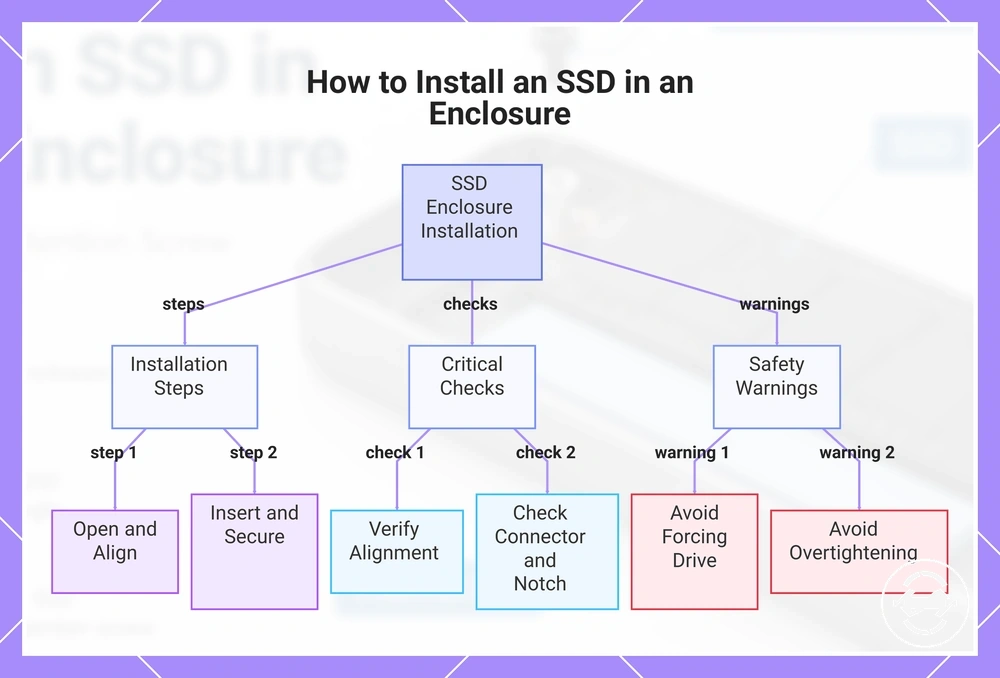
Installing the SSD follows a sequence of opening the enclosure, seating the drive, securing the retention point, positioning the thermal pad when used, and closing the enclosure. The exact opening and retention method depends on the enclosure design, but the overall installation sequence remains similar.
If the SSD does not align easily, stop before applying pressure. Check the connector, key notch, insertion angle, and retention method before continuing, and avoid overtightening screws or forcing the drive into the M.2 slot, as these can increase the risk of installation damage.
- Open the enclosure. Open the enclosure using its cover, latch, or retention method. Handle small screws or clips carefully to reduce the chance of losing them during installation.
- Align the connector. Position the SSD at the correct angle and align the key notch with the M.2 slot before insertion. If the connector does not line up naturally, recheck the alignment rather than applying pressure.
- Insert and seat the SSD. Slide the SSD into the connector until it is fully seated, then lower the free end toward the retention point. Keep even pressure on the drive to avoid unnecessary stress on the connector.
- Secure the drive. Fasten the SSD with the retention screw, peg, or latch used by the enclosure. Tighten only enough to hold the drive securely, as the required screw force varies by enclosure design.
- Place the thermal pad. If the enclosure uses a thermal pad, remove any protective film and position the pad so it contacts the SSD and enclosure body as intended. Correct placement depends on the enclosure layout.
- Close the enclosure. Close the enclosure and reconnect any cover screws or latches. Connect the USB cable for first use and check whether the enclosure is recognized before continuing with any setup outside the physical installation process.
This chart shows the main installation sequence, critical checks, and safety warnings for installing an SSD inside an enclosure.
Open the enclosure and expose the M.2 slot
Before applying pressure, identify how the enclosure cover opens so you can access the M.2 slot safely. The opening mechanism may use a latch, slide cover, or screw cover depending on the enclosure design. If the cover resists, stop and inspect for a hidden screw, clip, or latch before continuing to reduce the risk of damage to the tray or connector.
- Identify the opening mechanism. Check whether the enclosure uses a slide cover, latch, or screw cover before attempting to open the outer case. Use only the intended pressure point for that design.
- Open the enclosure carefully. Move the enclosure cover only enough to expose the tray and M.2 slot. If the enclosure uses a screw cover, remove the screws before lifting the cover.
- Inspect the connector orientation. Confirm that the M.2 slot and connector are fully visible so the SSD can be aligned correctly during insertion. Avoid unnecessary contact with the connector while handling the tray.
- Stop if resistance increases. If the enclosure cover does not release with its intended opening method, inspect for another latch, hidden screw, or locking point rather than applying additional pressure.
Insert the SSD at the correct angle
Insert the SSD by sliding it into the connector at the correct angle before pressing it down toward the retention point. Align the key notch with the connector and allow the SSD to seat through full contact rather than pressure. If resistance occurs during insertion, remove the SSD, check the alignment, and avoid forcing it into the connector.
- Align the key notch. Hold the SSD by its edges and line up the key notch with the connector so the drive enters in the correct orientation. If the notch does not align, remove the SSD and realign it before trying again.
- Slide the SSD into the connector. Insert the SSD at a shallow angle and slide it into the connector until the contacts are fully seated. If the drive does not slide in smoothly, stop and check the alignment instead of applying additional pressure.
- Press the SSD down. After the connector has full contact, press the free end of the SSD down toward the retention point. This movement follows seating in the connector rather than replacing it.
- Confirm the seated drive. Check that the SSD remains seated in the connector before securing it. If the drive shifts or lifts, remove it and repeat the alignment rather than increasing pressure.
Secure the drive without overtightening
Secure the SSD firmly enough to hold it flat without overtightening the retention hardware. A drive that is too loose may shift, while excessive pressure may increase the risk of board flex or thread damage. The enclosure may use a retention screw, peg, or latch to secure the SSD.
- Retention screw: Align the SSD end notch with the standoff before fastening the retention screw. Tighten only until the SSD is held flat and secure, as overtightening may increase the risk of board flex or thread damage.
- Peg: If the enclosure uses a peg, seat the SSD end notch fully over the retention point and check that the drive remains flat without lifting.
- Latch: If the enclosure uses a latch, engage it fully so the SSD is held securely without placing unnecessary pressure on the drive.
- Final check: Confirm the SSD stays flat against the standoff and does not move before closing the enclosure. If the drive shifts, check the retention method rather than increasing screw pressure.
Place the thermal pad for contact with the enclosure body
Place the thermal pad so it can contact both the SSD top surface and the enclosure body when the enclosure is closed. Remove the protective film before positioning the thermal pad if a liner is present, and check that closure creates the intended contact area. The thermal interface and pad position may vary by enclosure design, so avoid assuming every model uses the same arrangement.
- Protective film: Remove the protective film before closing the enclosure so the thermal pad can make contact with the SSD top surface and the enclosure body.
- Pad position: Place the thermal pad over the intended contact area on the SSD top surface. If the pad is misaligned, contact with the enclosure body or heatsink may be reduced.
- Pad thickness: Use the pad thickness intended for the enclosure so closure can create a contact path without leaving an obvious gap or placing unnecessary pressure on the SSD.
- Closure check: After closing the enclosure, confirm that the thermal pad remains between the SSD top surface and the enclosure body or heatsink. If contact is not achieved, heat transfer may be reduced depending on the enclosure design.
Close the enclosure and reconnect the outer case
Close the enclosure evenly so the SSD, thermal pad, and retention hardware stay aligned inside the outer case. Check internal clearance before sealing the cover, because uneven closure, rattling, or resistance may signal a fit issue.
- Check cover alignment. Align the cover with the tray or shell before closure. If the cover sits unevenly, reopen the enclosure and check whether the SSD, retention point, or thermal pad has shifted.
- Close the latch or replace screws. If the enclosure uses latch closure, press only at the intended closure point. If it uses screw replacement, reinstall the cover screws without adding excess pressure to the thread or cover.
- Confirm thermal pad compression. If a thermal pad is used, check that closure creates light contact with the enclosure body without shifting the SSD or lifting the cover.
- Check the cable port. Confirm the cable port remains clear and accessible after closing the outer case. Do not continue if the case rattles, gaps, or blocks the port opening.
Connecting the installed enclosure for first use
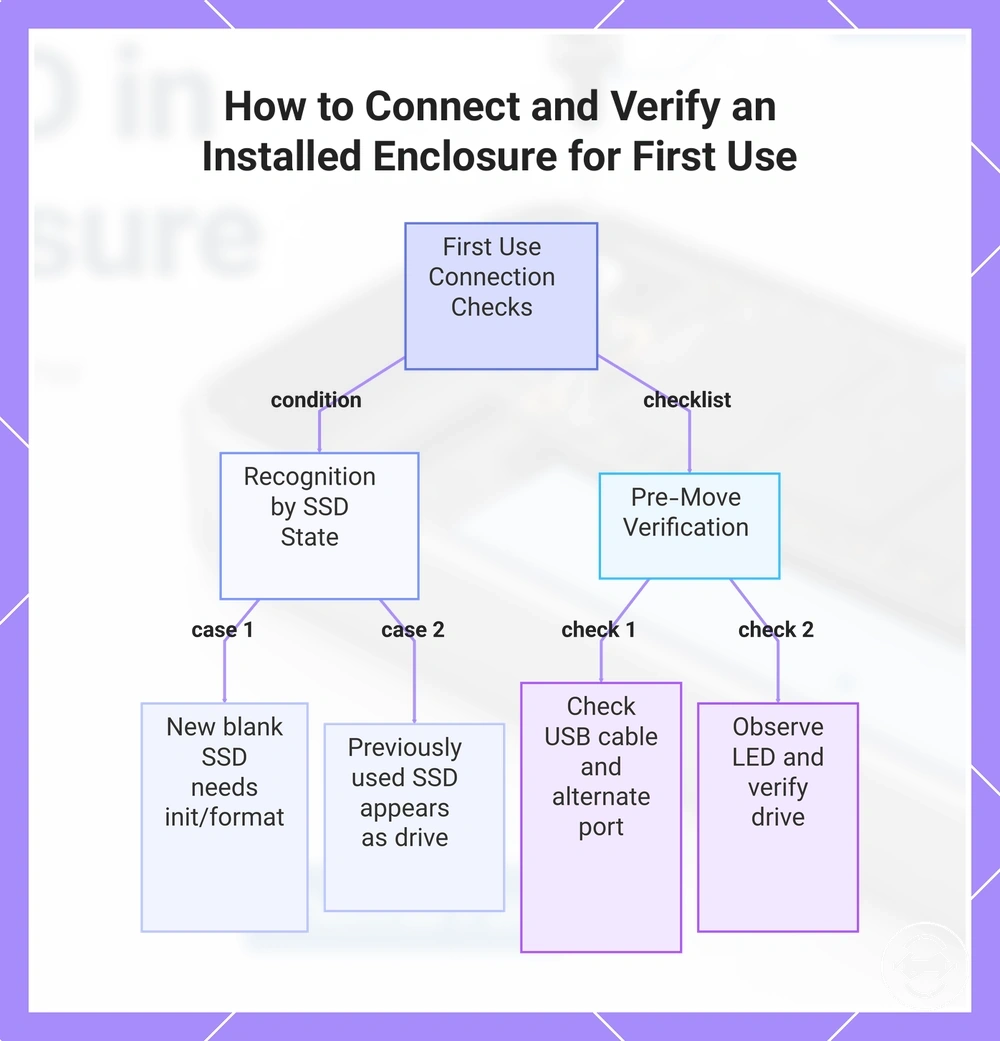
First use starts with connecting the installed enclosure to a computer and checking whether it is recognized. Detection confirms the enclosure can communicate through the USB cable and USB port, while usable storage also depends on whether the SSD is already initialized and formatted.
If the SSD is new and blank, the operating system may detect the enclosure without showing a usable drive until the SSD is initialized and formatted. If the SSD was previously used and already contains a supported file system, it may appear as a visible drive after recognition. These outcomes depend on the SSD's existing state rather than the physical installation alone.
If the enclosure is not recognized, check the USB cable, try another USB port, and observe the LED if the enclosure includes one. If the enclosure is detected but the SSD is not yet usable because it has not been initialized or formatted, use the operating system's disk utility and follow the guide to format the enclosure.
Before moving on, confirm these first-use checks:
- USB cable: Make sure the USB cable is fully connected at both the enclosure and the computer. A loose connection may prevent recognition.
- USB port: If the enclosure is not detected, try another USB port to help determine whether the issue is related to the connection.
- LED: If the enclosure has an LED, its activity may indicate that power or communication is present, depending on the enclosure design.
- Recognition: If the enclosure is recognized but no usable drive appears, check whether the SSD is initialized or requires formatting in the operating system's disk utility.
- Visible drive: If the SSD already contains a supported file system, it may appear as a mounted or visible drive after recognition.
This chart shows the first-use connection checks for an installed enclosure, including how recognition depends on the SSD state and the final verification checklist.
Installation issues that can stop the SSD from being detected
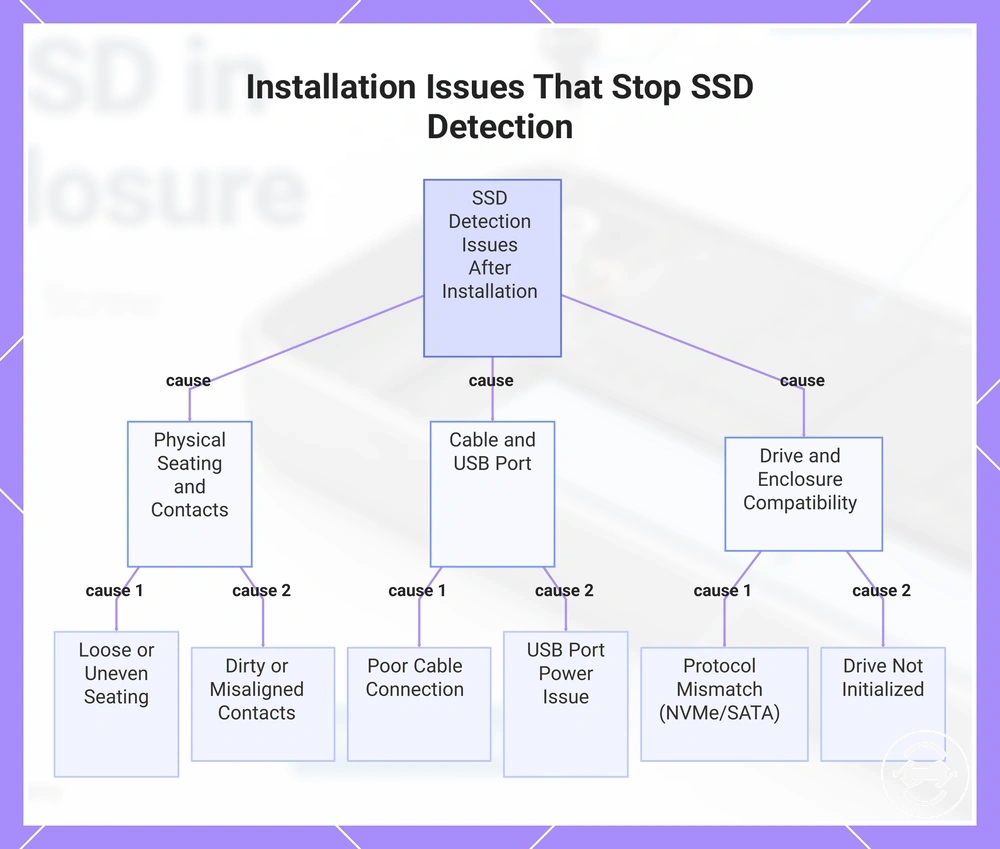
When an enclosure is not detected after installation, the cause may be loose seating, compatibility, cable connection, USB port power, or the SSD's initialization state. Start with quick physical checks before assuming a drive fault. Persistent recognition failure after these checks belongs in deeper troubleshooting for not detected after installation.
Check the connection path in the safest order: reseat the SSD, confirm enclosure support, inspect the cable and port, then check whether the operating system sees the drive state. This separates installation-adjacent causes from formatting or broader troubleshooting conditions.
- Not detected after assembly: Loose seating may prevent contact with the connector. Open the enclosure, reseat the SSD, and check whether recognition returns.
- Not showing up with a supported cable: Compatibility may be the issue if the enclosure does not support the SSD protocol. Confirm NVMe or SATA support before repeating installation checks.
- No response from the computer: A poor cable connection or USB port issue may interrupt power or communication. Reconnect the USB cable and try another USB port.
- Intermittent recognition: Dirty contacts or uneven seating may affect the connection path. Inspect the connector area carefully and reseat the SSD if contact looks uncertain.
- Detected but not usable: A blank drive may need initialization before it appears as a visible volume. Check the operating system's disk utility before assuming a physical installation fault.
- Recognition changes after closure: Retention pressure, closure pressure, or a shifted thermal pad may affect the seated drive. Reopen the enclosure and check whether the SSD remains flat and secure.
This chart categorizes the common installation-related causes of an SSD not being detected after assembly in an enclosure.
Loose seating, dirty contacts, or weak cable connection
Loose seating, dirty contacts, or a weak cable connection can prevent SSD detection even when the SSD and enclosure are otherwise compatible. These issues usually require reseating the SSD, checking the connector and cable connection, or inspecting the connection path before assuming a drive fault. Disconnect the enclosure before handling the SSD or cleaning the contacts.
- Loose seating: If the SSD is not showing up, check whether it is fully seated in the connector. Reseat the SSD carefully and confirm it sits flat before closing the enclosure.
- Dirty contacts: Contact debris may interrupt detection. Inspect the SSD contacts for visible contamination and clean them gently with an appropriate method before reconnecting the drive.
- Weak cable connection: If recognition is intermittent or absent, check that the USB cable fits securely at both ends. If needed, try another compatible cable or a different USB port.
- USB port stability: A USB port may not provide a reliable connection in every situation. Test another USB port if the enclosure is not detected after confirming the cable fit.
- Enclosure closure: If detection changes after closing the enclosure, check whether enclosure closure or retention pressure has shifted the SSD away from the connector. Reopen the enclosure and confirm the SSD remains properly seated.
Uninitialized drive after a successful physical install
A successful physical installation does not always mean the SSD is ready to use as a visible storage volume. An uninitialized drive can be detected by the operating system but still remain unavailable in the file manager until it is initialized and formatted with a usable file system. Check the operating system's disk utility before deciding whether formatting is appropriate, because formatting can result in data loss.
If the SSD appears in the disk utility but not as a mounted storage volume, the issue may relate to its initialization state, partition table, or file system rather than the physical installation. Confirm the drive state before making changes, especially if the SSD may already contain data.
- Uninitialized drive: If the SSD is detected but not shown as a visible storage volume, it may not be initialized. Do not assume the physical installation has failed.
- Partition table: If the drive appears in the disk utility without a usable partition table, it may not yet be ready for normal storage use. Do not assume the drive should be erased without confirming its contents.
- File system: A detected SSD without a supported or usable file system may not appear as a mounted volume. Detection and usable storage are separate conditions.
- Data loss caution: If formatting is being considered, first confirm whether the SSD is a new blank drive or contains existing data, because formatting may result in data loss.